Style Programming Language
STPL provides a way to eliminate a lot of work in tweaking styles. Instead of opening each style individually and change a few things, you write a program with instructions and run this program on all the styles in selected folders. Of course you must be able to define what exactly must be modified in each style.
STPL is relatively easy to use compared with other programming languages like C++, Visual Basic, Java and Delphi. It has much less instructions and these instructions are specifically aimed to handling the data in Yamaha styles. It is presumed that you already did some editing on styles in OMB's StyleMaker window or other tools, and that you know how the data in a style is organised in Parts, Tracks and MIDI events. But you can also use STPL to get insight in this by writing small programs that display and play parts of the style.
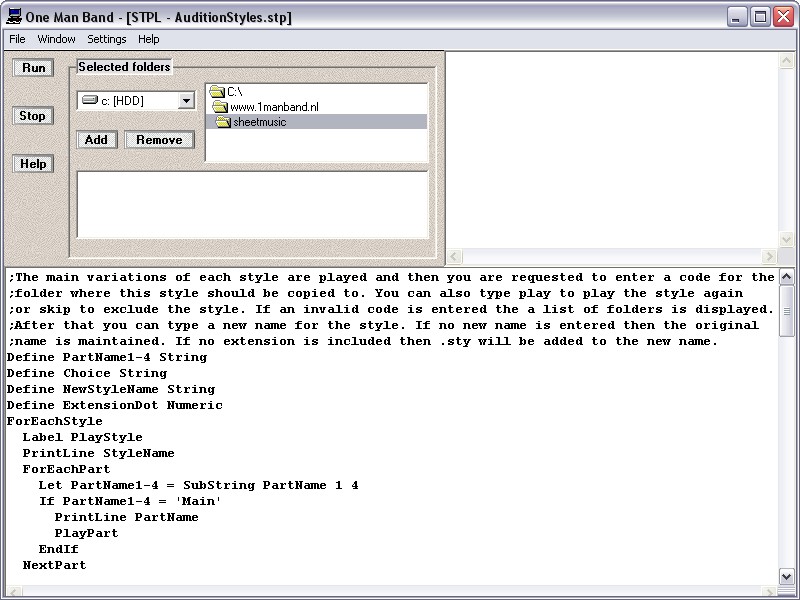
You reach the STPL window with menu Window>Stpl. The lower part of the window is where you type your program instructions. The upper right part is where messages are displayed during execution (when you press the Run button). The upper left part is to define which folders with styles are processed. With the Add and Remove button you can make a list of folders. When you run the program then all the styles in the listed folders are processed. That is, if the ForEachStyle instruction is present in your program. Otherwise only the currently loaded style will be processed.
Before you run a program you must first write it or load an existing one in the file menu. Then press the Run button. In the upper right corner the message "Compiling..." appears. After that a syntax error message may occur and the line in your program that contains the error is higlighted. A syntax error occurs when an instruction name or variable name is not correctly spelled, or anything else is not according to the language rules for STPL. Correct the error in your program and run the program again. When there are no other errors then after "Compiling..." comes a line with "Running..." and finally "Finished".
Variables
Programming is all about manipulating variables. A variable has a name and a contents. In STPL their are only 2 types of variables: Numeric and String. Numeric variables contain integer numbers. Samples of valid numeric variables are 127 and -1. Broken values like 3.14 are not allowed. String variables contain text like the stylename.
Before you can use a variable you must first define it at the start of the program. Each Define instruction is written on a separate line beginning with the word Define. The second word is the name that you want to give to the variable and the third word is the type of the identifier (Numeric or String).
Beside the variables that you define yourself, there are also predefined variables. These contain variables in the style like the status, databyte1 and databyte2 of MIDI events and the names of styles, parts and tracks. Instructions that use these variables must always be inside the ForEach loop that processes this type of data. E.g. event variables should be used inside a ForEachEvent loop and track variables inside a ForEachTrack loop. Outside their loop the contents of these variables is unpredictable. A listing of which predefined variables belongs to each ForEach loop is in the help file.
Displaying things
The smallest imaginable STPL source will only contain 1 instruction:
PrintLine StyleName
It will display the name of the current style name. You can add lines with instructions to display the FolderName, Tempo, BeatsPerMeasure and TicksPerBeat. Each will be displayed on a separate line. In a program that is processing many styles in folders, you may find it more convenient to print all the variables of a style on the same line. This can be done as follows.
Print StyleName
Print ' '
Print FolderName
Print ' '
Print Tempo
Print ' '
Print BeatsPerMeasure
Print ' '
Print TicksPerBeat
PrintLine ''The Print instruction will not skip to the next line. The Print instructions with ' ' ensures that there will be a space between each value on a line. The last PrintLine instruction will provide the skip to the nextline. Because the printed line is empty (no spaces between the quotes in the PrintLine instruction) there will only be a skip to the next line without displaying an empty line in between. If you want an empty line in between then put a space between the quotes in the PrintLine instructions. The Print and PrintLine must always be followed by one variable. Instead of a variable you can also specify a numeric or string value. A string value is specified between single quotes. A numeric value is specified without quotes.
Walking thru the styles
The program instructions that you write are executed from top to bottom. So normally the next instruction to execute will be the one on the next line. However there are instructions that may or may not continue on the next line. These are the If and the Next instruction.
The If instruction contains a expression that is either true or false. If the expressions is true then the program will continue with the instruction on the next line. If the expression is false then the execution continues with the instruction that follows the line with the EndIf instruction.
If BeatPerMeasure = 3
PrintLine StyleName
Endif
In the program lines above, only styles that have 3 beats in each measure are displayed (waltzes). If .. EndIf instructions can also be nested. In that case, when the condition is false, program execution will jump to the matching EndIf. If there are first three If's and then three EndIf's then execution will jump from the first If to the last EndIf if the expression in the first If is false.
If BeatPerMeasure = 3
If Tempo > 180
PrintLine StyleName
EndIf
Endif
In the nested If above only fast Waltzes will be displayed.
The other situation in which execution may or may not continue with the next instruction, is when an instruction starting with "Next" is encountered. These instructions are part of a ForEach .. Next loop. These loops are ForEachStyle .. NextStyle, ForEachPart .. NextPart, ForEachTrack .. NextTrack and ForEachEvent .. NextEvent.
If a ForEachStyle loop is present in a program then it will be always on the outside. That is the ForEachStyle will be the first ForEach instruction and the NextStyle will be the last Next instruction in the program. The program will open each style in the folderlist, one after another, and execute the instructions between the ForEachStyle and the NextStyle instructions. Because these instructions are repeated for each style, this part of the program is called a loop. Each time the execution reaches the NextStyle instruction it will check wether there is another style in the folders. If there is then it will load this style, go back to the ForEachStyle instruction and resume with the instruction following that line. If there are no more styles to process the execution will continue with the line following the NextStyle instruction.
A style contains several parts: "Intro A", "Main A" etc. Inside a ForEachStyle loop you can place a ForEachPart loop. If there is no ForEachStyle loop, that is you are only processing the currently loaded style, then the ForEachPart loop can be the outside loop. The instructions between the ForEachPart and NextPart instructions are repeated with each part that is found in the current style. So each time the NextPart instruction is encountered, it will be checked if there is another part to process. And if there is, execution will be restarted from the ForEachPart instruction otherwise the instruction after the NextPart instruction wil be executed.
Inside the ForEachPart you can place the ForEachTrack loop. The tracks are the instruments in a part like the drums, bass etc. There are always 16 tracks in a part, however there is not always something in the track. The instructions inside the ForEachTrack are repeated 16 times anyway. To exclude the empty tracks you can check the predefined variable TrackChannel, if it is 0 then this is definitely an empty track.
The ForEachEvent loop should be placed inside the ForEachTrack loop. The instructions inside the ForEachEvent loop will be repeated with any MIDI Event inside the Track. That is note-on, note-off, controllers and instrument patches.